
1 Introduction
In my work, I needed to create quickly a bunch of instances of WordPress for testing. Doing that via the AWS Management Console would work but this was a great opportunity to create something for future projects. As a result, here is a CDK script and a procedure to help our developers and you how deploy images from the AWS Marketplace. If you know all of these tools and technologies, you may skip to Section 3.
2 Why AWS, CloudFormation & CDK?
2.1 AWS
Amazon Web Services is the oldest and with the most services of the Cloud Infrastructure and Platform Services companies and has been in the leaders quadrant of the Gartner Magic Quadrant for years 1. Due to these reasons, it makes sense to choose AWS if you are comparing cloud providers, but you cannot really go wrong with any of them. In this article, I focus on AWS because it is so popular.
2.2 CloudFormation
Infrastructure as code (IaC) makes handling your cloud deployments easier and creates a great way to keep track of changes to your cloud environment in a version control system, like Git. CloudFormation is the IaC solution for the AWS Cloud, with which you can define e.g. your EC2 instances, Lambda functions, IAM permissions, and create the connections between these cloud resources, like you could using the graphical AWS Console website app 2. The CloudFormation templates are defined in JSON or YAML -formats.
2.3 Cloud Development Kit (CDK)
When you are already familiar with CloudFormation and the AWS services, and all the resources that you can provision, you understand that there are tons of various configurations that you can do. CDK will help with defining your cloud deployment with fewer lines of text, compared to the CloudFormation templates, and the definitions can be done in an imperative way using your favorite programming language. Therefore, writing unit tests for these files is easy, and you can have a test suite to ensure that no unwanted changes are made. 3
However, if you are not so familiar with all the tools and AWS in general, the CDK may be the easiest way to start exploring the world of infrastructure as code, because it comes with a great documentation and you do not need to necessarily know all the configurations that are required to deploy an EC2 instance for example. Also, this tool scales better for larger projects that easily end up with CloudFormation templates that are hundreds of lines of YAML or JSON.
3 Steps
3.1 Preconditions
The needed steps to take before continuing
- AWS account. Refer to the Sign up for AWS page 4, if you do not have one already.
- AWS CLI installed and configured. Read the AWS Command Line Interface documentation 5, if you have not done this before.
- IAM permissions to do the operations.
- You can ignore this if you just signed up for a new account, because you are the super admin in that account, and you have all the permissions then.
- Node 14.x installed globally
3.2 Architecture
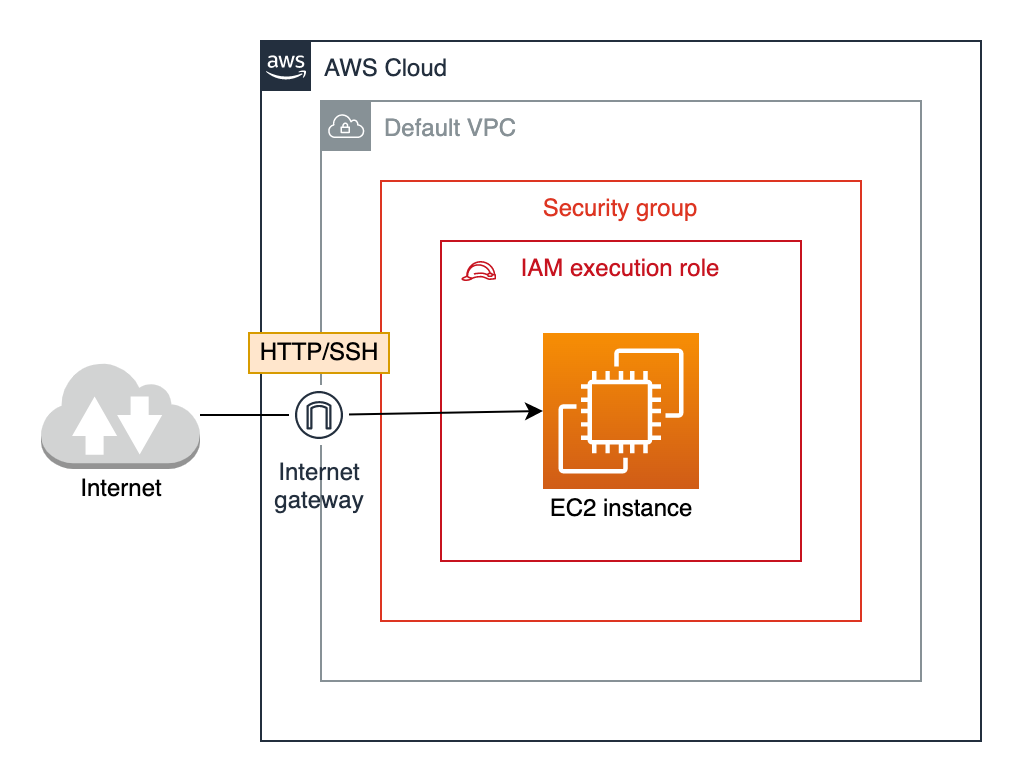
In this exercise, we are going to create a simple WordPress site that uses a single EC2 instance with the database running on the instance itself, because we are not looking for a high-performance website right now. This solution will work well for you for testing purposes or even production deployment in the beginning.
In Figure 1, you can find all the components that we need to define when we are using infrastructure as code. This is a simple placeholder structure for the EC2 instances that we are going to deploy.
3.3 Creating an EC2 key pair for our instance
We need to create a new key pair for the EC2 instance that we are going to deploy. You can go to the AWS Management Console - EC2 - Network & Security and Key Pairs to create a new key and download the pem-file. However, commands are faster and you have the AWS CLI configured already. This command will create the key, and download it for you to the folder where you run it 6.
$ aws ec2 create-key-pair --key-name wordpress-key-pair --query "KeyMaterial" --output text > ~/wordpress-key-pair.pem
Once you have the pem-key, move it where you want it to be and run the following command to restrict the permissions of the key. It won’t work before you do this.
$ chmod 400 ~/wordpress-key-pair.pem
3.4 Installing the CDK and starting our project
Making sure that we have Node.js 14.x or higher installed, we can run:
$ npm install -g aws-cdk
Now that we have the CDK CLI installed, we can create a new folder for our project and initialize it with the tool:
$ mkdir wordpress-cdk
$ cd wordpress-cdk
$ cdk init app --language typescript
The CDK CLI creates a simple project structure for us with lib, cdk.out, bin, and test -folders. We will edit our infrastructure in the lib folder and CDK will compile the code to a CloudFormation template in the cdk.out folder. The test folder is there so that we could write unit tests for our infrastructure code. More information about the project structure can be found on the cdkworkshop.com 7.
Before we start, the configuration operations are not done yet. We need to specify the Account ID and the Region to the CDK tool. To do that, navigate to the file in the bin-folder, and replace the code in the file with the code below or simply uncomment the line 18 in the default file. Then replace the account-variable with the Account ID of your AWS account, and the region to which you wish to deploy the CloudFormation Stack, i.e. where do you want the server to reside.
// ./wordpress-cdk/bin/wordpress-cdk.ts

#!/usr/bin/env node
import 'source-map-support/register';
import * as cdk from '@aws-cdk/core';
import { WordpressCdkStack } from '../lib/wordpress-cdk-stack';

const app = new cdk.App();
new WordpressCdkStack(app, 'WordpressCdkStack', {
  env: { account: '123456789012', region: 'us-east-1' },
});
Alternatively, if you follow the instructions in the default file, you may also specify an .env-file. That is recommended for production deployments.
3.5 Find the Amazon Machine Image (AMI) that you want to deploy
If deploying the latest version of the image is not important to you, you can skip to next section and simply copy the AMI name from the text or sample code.
Since we can use this script to launch any type of EC2 instance, we first have to find the image to create the instance. To search for the images, you can check which images are available AWS Management Console at https://console.aws.amazon.com/ec2/v2/home#LaunchInstanceWizard: or directly from the AWS Marketplace public website 8.
If you want to launch an image from the AWS Marketplace, you need to do a bit more digging since the AWS Marketplace page does not list the AMI information. So, for example, look for the latest WordPress from the AMIs with the following AWS CLI command.
$ aws ec2 describe-images --filters "Name=name,Values=*bitnami*wordpress*5.8*debian*" --query 'sort_by(Images, &CreationDate)[].[Name,CreationDate]'

...
    [
        "bitnami-wordpress-5.8.0-2-r01-linux-debian-10-x86_64-hvm-ebs-nami",
        "2021-08-04T21:49:41.000Z"
    ],
    [
        "bitnami-wordpress-5.8.0-2-r01-linux-debian-10-x86_64-hvm-ebs-nami-7d426cb7-9522-4dd7-a56b-55dd8cc1c8d0",
        "2021-08-04T22:41:53.000Z"
    ],
    [
        "bitnami-wordpressmultisite-5.8.0-2-r01-linux-debian-10-x86_64-hvm-ebs-nami",
        "2021-08-04T23:13:55.000Z"
    ],
...
Then select the latest image by name, and take note of the name of the image. We will use it later in the CDK script. In this case, we select the latest WordPress from Bitnami bitnami-wordpress-5.8.0-2-r01-linux-debian-10-x86_64-hvm-ebs-nami.
3.6 Adding components to our stack
Next, we will start adding the elements to our new CDK stack. A stack corresponds to a CloudFormation stack which is a logical collection of services. In this case, our stack is the entire deployment of our website including the Virtual Private Cloud (VPC), Load Balancer, and Certificates. If we were to add a single-page application that is deployed to an S3 bucket, it should be contained in another stack.
To start, we need to install each of the CDK components that we need to our project. First, we need the EC2 and IAM packages, so let’s install them using npm.
$ npm install @aws-cdk/aws-ec2 @aws-cdk/aws-iam
After we have specified these, we can navigate to the lib/wordpress-cdk-stack.ts file that contains the resources definitions of the stack, and start adding the elements of our cloud deployment that we need for this to work. First, we need a VPC for the EC2 instance to reside in. For this, we can use the default VPC that you already have. To access it in the CDK code, we can use the ec2-package VPC-class and use the fromLookup-function to get the reference to the VPC. We will also add the execution role that we need to reference later, as well as the Security Group that we will add two IngressRules. 22 for our SSH access, and port 80 for the HTTP access.
// ./wordpress-cdk/lib/wordpress-cdk-stack.ts

import * as cdk from '@aws-cdk/core';
import * as ec2 from '@aws-cdk/aws-ec2';
import * as iam from '@aws-cdk/aws-iam';

export class WordpressCdkStack extends cdk.Stack {
  constructor(scope: cdk.Construct, id: string, props?: cdk.StackProps) {
    super(scope, id, props);

    const vpc = ec2.Vpc.fromLookup(this, 'VPC', { isDefault: true })
    const role = new iam.Role(this, 'wordpress.instance.role', { assumedBy: new iam.ServicePrincipal('ec2.amazonaws.com') })

    const sg = new ec2.SecurityGroup(
      this,
      'wordpress.instance.sg',
      {
        vpc: vpc,
        allowAllOutbound: true,
        securityGroupName: 'wordpress.instance.sg'
      }
    )

    sg.addIngressRule(
      ec2.Peer.anyIpv4(),
      ec2.Port.tcp(22)
    )

    sg.addIngressRule(
      ec2.Peer.anyIpv4(),
      ec2.Port.tcp(80)
    )
  }
}
Now that we have the components specified that our EC2 instance needs, we can start specifying the instance itself. We use the ec2.Instance-class to create the instance. Note that now we are using the lookup-function to look for the image itself by the name that we checked previously. You can use wildcards in this phase as well if you want to automate the image discovery in the script.
We are using the variables for VPC, role, and security group in the constructor of the EC2 instance, as well as specifying the type of EC2 instance and its name.
This is the final stack script, including printing the IP address of the launched instance for you after the CDK has created the stack and the launching is underway.
// ./wordpress-cdk/lib/wordpress-cdk-stack.ts

import * as cdk from '@aws-cdk/core';
import * as ec2 from '@aws-cdk/aws-ec2';
import * as iam from '@aws-cdk/aws-iam';

export class WordpressCdkStack extends cdk.Stack {
  constructor(scope: cdk.Construct, id: string, props?: cdk.StackProps) {
    super(scope, id, props);

    const vpc = ec2.Vpc.fromLookup(this, 'VPC', { isDefault: true })
    const role = new iam.Role(this, 'wordpress.instance.role', { assumedBy: new iam.ServicePrincipal('ec2.amazonaws.com') })

    const sg = new ec2.SecurityGroup(
      this,
      'wordpress.instance.sg',
      {
        vpc: vpc,
        allowAllOutbound: true,
        securityGroupName: 'wordpress.instance.sg'
      }
    )

    sg.addIngressRule(
      ec2.Peer.anyIpv4(),
      ec2.Port.tcp(22)
    )

    sg.addIngressRule(
      ec2.Peer.anyIpv4(),
      ec2.Port.tcp(80)
    )

    const wordPressInstance = new ec2.Instance(this, 'wordpress.instance.1', {
      machineImage: ec2.MachineImage.lookup({ name: 'bitnami-wordpress-5.8.0-2-r01-linux-debian-10-x86_64-hvm-ebs-nami'}),
      keyName: 'wordpress-key-pair',
      securityGroup: sg,
      role: role,
      vpc: vpc,
      instanceName: 'wordpress.instance.1',
      instanceType: ec2.InstanceType.of(
        ec2.InstanceClass.T2,
        ec2.InstanceSize.MICRO
      )
    })

    new cdk.CfnOutput(this, 'publicIp', {
      value: wordPressInstance.instancePublicIp
    })
  }
}
3.7 Deploying the CDK stack
Now that we have completed the script, we can check that it works by synthesizing it to a CloudFormation template without yet attempting to deploy it to AWS. The following command does just that.
$ cdk synth
As a result, we got a new WordpressCdkStack.template.json file in the ./cdk.out -folder as well as printed the JSON template to the screen. If you saw any errors at this point, check the CDK script for issues.
If you already know how CloudFormation works, you can evaluate the template and check that it is what you would have written yourself. If you do not, don’t worry, this is an optional step because the CDK script is the meaningful piece of code that you need to understand. CDK makes simply writing these CloudFormation templates easier and allows better testing during coding, and that is the beauty of the CDK itself.
After we have confirmed that our script works, we can deploy the stack to AWS. The following command will deploy the CloudFormation stack and provision all of the resources that we have defined.
$ cdk deploy
You should be asked to confirm that you want to make the following changes to your IAM roles and security groups. These are fine because these are the changes that we did. This is the point at which you should check that some module that you initialized is not trying to give too many permissions to the resources that you are deploying.
Please confirm you intend to make the following modifications:

IAM Statement Changes
┌───┬────────────────────────────────┬────────┬────────────────┬───────────────────────────┬───────────┐
│   │ Resource                       │ Effect │ Action         │ Principal                 │ Condition │
├───┼────────────────────────────────┼────────┼────────────────┼───────────────────────────┼───────────┤
│ + │ ${wordpress.instance.role.Arn} │ Allow  │ sts:AssumeRole │ Service:ec2.amazonaws.com │           │
└───┴────────────────────────────────┴────────┴────────────────┴───────────────────────────┴───────────┘
Security Group Changes
┌───┬──────────────────────────────────┬─────┬────────────┬─────────────────┐
│   │ Group                            │ Dir │ Protocol   │ Peer            │
├───┼──────────────────────────────────┼─────┼────────────┼─────────────────┤
│ + │ ${wordpress.instance.sg.GroupId} │ In  │ TCP 22     │ Everyone (IPv4) │
│ + │ ${wordpress.instance.sg.GroupId} │ In  │ TCP 80     │ Everyone (IPv4) │
│ + │ ${wordpress.instance.sg.GroupId} │ Out │ Everything │ Everyone (IPv4) │
└───┴──────────────────────────────────┴─────┴────────────┴─────────────────┘
You will see “✅ WordpressCdkStack” text appear when the stack has completely been initialized. You can also see the output of the public IP that we told CDK to print for us. Now we can use that IP to login to our instance or simply navigate to the IP address to view our WordPress site. To login to the instance using SSH, simply provide the key that we created earlier with the SSH command. On Windows, you may use PuTTY 9.
$ ssh -i ~/wordpress-key-pair.pem bitnami@<public IP>
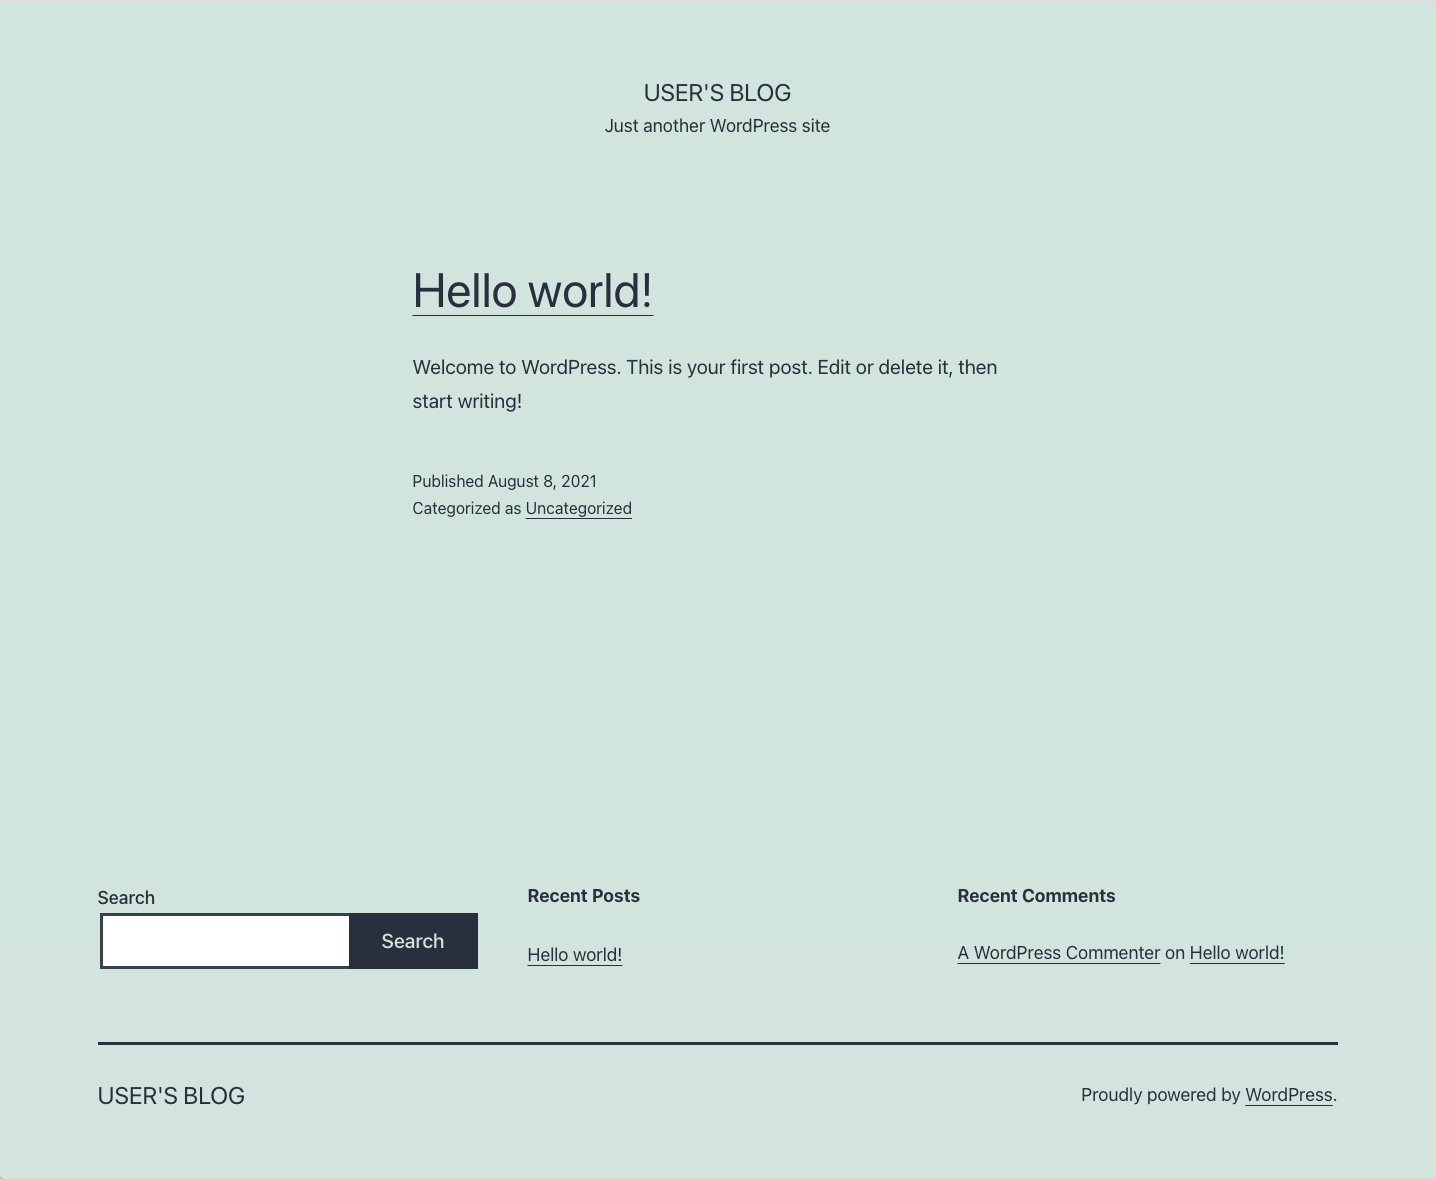
When you navigate to your WordPress site, you should see the following first page. Note that if you are following this tutorial later than in 2021, the first page of the WordPress site may have changed.
If you wish to use the WordPress instance, you may follow the instructions from the Bitnami beginner tutorial to get the credentials to log in to the site 10.
3.8 Removing of the resources from AWS
If you have been following this blog post, bear in mind that some of the services will cost money to run, so your credit card will be charged. To avoid that, if you are not planning to use the website, please run the following command to delete it completely.
$ cdk destroy
CDK and CloudFormation stacks help us in this case as well because we do not need to go delete all the resources by hand now that we want to delete them. A simple command will suffice and we will have undone the changes to the AWS Cloud in a blimp.
4 Conclusion
In the article, we created a simple CDK script that creates an EC2 instance using a CloudFormation stack and an AWS Marketplace image. The lines of code that we had to write are minimal compared to the JSON-output CloudFormation template that we had to write ourselves prior to the invention of the CDK.
The next step on the journey to learn CDK is to add the unit tests for each of the components that we specify and group each of them logically within the project.

